Starter Care 101

John Scalo
July 1, 2020
When it comes to baking sourdough, starter care is one of the few things that can easily make or break your final loaf. Since commercial yeast isn't typically used when baking sourdough, the yeast (and various other bacteria) in the starter takes on the sole responsibility of spurring fermentation, ultimately resulting — hopefully — in a beautiful tasty loaf of bread!
In this article, I touch on the basic routine of feeding and caring for your starter.
Note
If you don't yet have a starter, we cover creating your own starter from scratch here.
Contents
- What does it mean to “feed” a starter?
- Ratios and hydration
- Following a starter feed schedule
- What do I feed my starter with?
- Baking with your starter
- Backing up your starter
- Diagnosing problems
What does it mean to “feed” a starter?
Since a starter is constantly "eating" the sugars in the flour that surround it, we need to periodically "feed" it! If the starter doesn't get fed, then it gets unhappy and stops functioning. The good news is that starter cultures are incredibly resilient. Unless you literally cook your starter, or neglect it for a very long time, chances are it can be brought back to health.
The process of feeding a starter is simply throwing out most of it, then adding back more flour and water. You typically do this twice a day before baking, but can keep the starter in the fridge between bakes. When storing in the fridge you can keep your starter healthy by feeding it about every two weeks. This will feel wasteful at first because you're constantly throwing away most of your starter! With sourdough, that's just the price of progress, but if you like you can save your sourdough discard in a separate jar in the refrigerator and use it for sourdough discard recipes.
Note
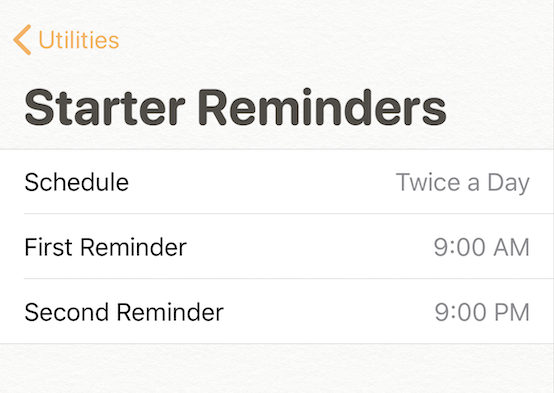
The Rise app can remind you when to feed your starter, even if it's in the fridge. You can set up reminders in the Starter Feed Reminders section of the Utilities tab.
Ratios and hydration
Before getting into the routine of feeding your starter, it's important to understand the concept of starter ratios. A starter ratio looks something like "1:4:4" and means "1 part starter, 4 parts flour, and 4 parts water." I'll reference starter ratios a lot below as we talk about how to control starter growth.
It's also helpful to understand the concept of starter hydration. Starter hydration simply refers to the percentage of water that's in the starter. A "liquid starter" typically has equal amounts of flour and water while a "stiff starter" has more flour than water. A starter with equal amounts of flour and water is said to have 100% hydration. For beginners I recommend maintaining a starter with 100% hydration, aka a liquid starter. With a liquid starter, it's easier to observe what's going on, diagnose problems, and deal with ratios (math, ew!).
Following a starter feed schedule
OK, let's take a look at an example starter maintenance schedule. This is a schedule that I like to use in the winter months when it's colder:
When removing from the fridge
9am or 9pm: Feed at 1:1:1 ratios, with 15g starter, and with 78°F (25.5°C) water.
For 2x feedings
9am: Feed at 1:3:3 ratios, with 5g starter, and 73°F (23°C) water.
9pm: Feed at 1:3:3 ratios, with 5g starter, and 76°F (24.5°C) water.
Bake (or mix) day
Feed at 1:2:2 ratios, using enough starter to accommodate the recipe, with 83°F (28.5°C) water.
Let's talk about each part.
When removing from the fridge
9am or 9pm: Feed at 1:1:1 ratios, with 15g starter, and with 78°F (25.5°C) water.
Here, the starter has just come out of the refrigerator so it's very cold. Because it's so cold, and because I'm aiming to feed it twice a day, I want to use ratios and water temperature that will result in a starter that's peaking in about 12 hours. Feeding at 1:1:1 with 15g starter means using 15g starter, 15g flour, and 15 water. The low ratios and warm water will help the cold starter become active again!
Peak refers to the point in time when the starter is most active. Knowing when your starter is at its peak is easy— it's when the starter has reached its highest point in the jar.
For 2x feedings
9am: Feed at 1:3:3 ratios, with 5g starter, and 73°F (23°C) water.
9pm: Feed at 1:3:3 ratios, with 5g starter, and 76°F (24.5°C) water.
At this stage, the starter has bounced back from being in the fridge so you'll need to use higher ratios (1:3:3) and cooler water, otherwise it will peak too early. And yes, 5g of starter is not very much! If you scrape out the starter in your jar until it looks like there's almost nothing left, that might add up to about 5g. Don't worry, more is not better here and and keeping the amounts down will keep you from burning through too much flour.
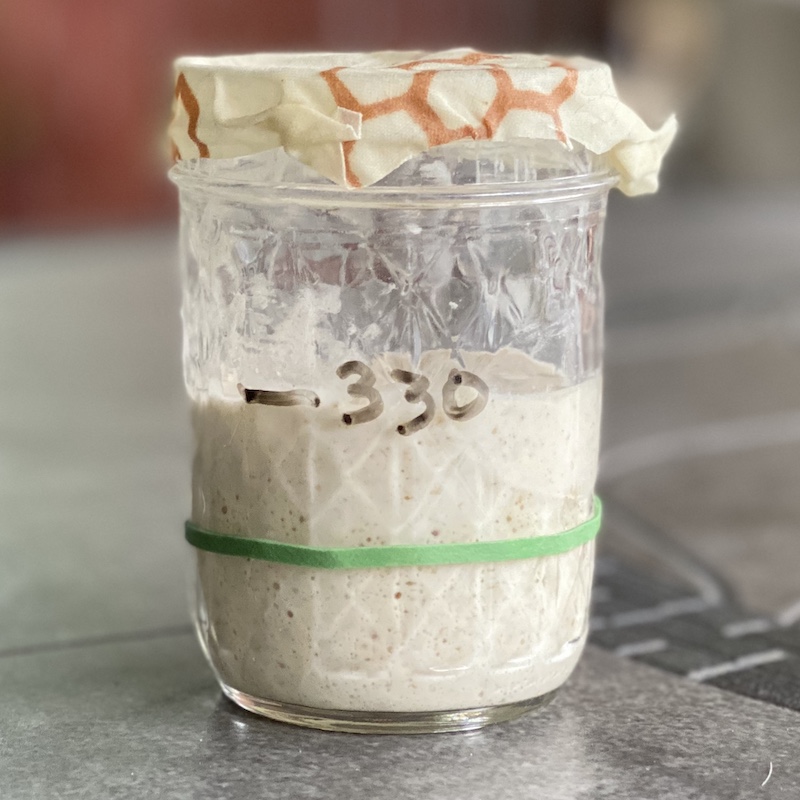
Here the water is a little warmer at night since it's colder. In general though, you should be adjusting your ratios so that at the next feeding the starter is at its peak. For colder temps, use lower ratios. For higher temps, use higher ratios. During the summer, thanks to the Texas heat, I might use ratios as high as 1:8:8! To get a feel for when the starter is peaking, put a rubber band over your jar where the starter begins. Then check on it every two hours or so and mark the new level with a marker (a wet erase marker is great for this).
Bake (or mix) day
Feed at 1:2:2 ratios, using enough starter to accommodate the recipe, with 83°F (28.5°C) water.
It's bake day! So you want your starter to be as healthy and strong as possible, but you also need it to be ready by the time your recipe calls for it. I usually feed my starter at 8 or 9am hoping to mix it into the dough by 1pm. Since that's only 4 or 5 hours, I need to use much lower ratios and warmer water to have it ready. This again illustrates how you can adjust ratios to control how fast the starter grows.
In the summer months (and these are Texas summers: 100°F (38°C) outside and 78°F (25.5°C) inside) my schedule looks more like this:
When removing from the fridge
9am or 9pm: Feed at 1:1:1 ratios, with 15g starter, and with 78°F (25.5°C) water.
For 2x feedings
9am: Feed at 1:8:8 ratios, with 3g starter, and 75°F (24°C) water.
9pm: Feed at 1:7:7 ratios, with 3g starter, and 75°F (24°C) water.
Bake (or mix) day
Feed at 1:2:2 ratios, using enough starter to accommodate the recipe, with 83°F (28.5°C) water.
The summer schedule is mostly the same except for the 2x feeding which use higher ratios to accommodate the warmer temps. It's colder at night so the ratios can be a little lower.
Jot down a schedule for yourself and keep an eye on your starter during the day, using a rubber band and/or wet erase marker to track the starter's peak on the jar. If it's peaking well before the next scheduled feed, increase your ratios. And vice versa: lower the ratios if it hasn't peaked yet.
BTW, when to wash and swap out your jar is entirely up to you. Some people simply never do, and that's fine. Because I use such small amounts of starter, I need to be able to measure it precisely so I use a clean jar with every feed.
What do I feed my starter with?
Every starter is different and different starters seem to prefer different flours. I have 3 different starters that I use and all 3 are pretty happy with a 90% AP flour / 10% rye flour mix, so you might start with that. Some prefer 100% whole wheat for their starter but if you go that route, be advised that starter yeast will chew through whole wheat much faster than white flours, so increase your ratios. Also keep in mind that, depending on the recipe, the starter can make up a significant percentage of the final weight of the loaf so the flour mix of the starter might change the color or flavor of the recipe.
Baking with your starter
On bake day (or the day before if you proof in the fridge), you want your starter to be at its absolute peak before mixing it with the flour to start the bulk rise stage. Ensuring your starter is at its peak requires some vigilance, but you'll be rewarded with strong dough that maintains its shape and results in an optimum final rise. Below I list in detail the steps to take to ensure your starter is ready to go before baking. I use 9am and 9pm as an example, but feel free to use whatever times you want as long as they're 12 hours apart.
Day 1, 9am
- Remove your starter from the fridge
- Move 15g of it into a clean 8 oz jar and add 15g warm water (about 78°F / 25.5°C).
- With a small spatula, stir the starter and water together until combined, then add 15g of flour. Like I mentioned above, a 90/10 AP flour/rye flour mix works well here.
- Thoroughly mix in the flour until absolutely no dry bits remain.
- Loosely cover the jar so that the expanding gasses can escape.
- With a rubber band or a marker, mark where the top of the starter is in the jar.
- The remaining starter in the old jar can be discarded.
Day 1, 9pm
By the evening the starter should have grown some, however it's still bouncing back from being inactive in the fridge so it's OK if it seems anaemic. This time you'll feed at higher ratios. Below I list 1:3:3, but in warmer kitchens you may need 1:5:5 or even higher.
One trick I use during the summer is rather than increasing ratios (which can waste a lot of flour), I put the jar in the fridge for about an hour and a half just after feeding.
- Move 10g into a clean 16 oz jar, and add 30g warm water (about 78°F / 25.5°C). Discard the remaining starter.
- Stir the water and starter together, then add 30g of flour and thoroughly mix.
- Loosely cover the jar and mark the top line with a rubber band.
Day 2, 9am — Mixing Day
Hopefully your starter has at least doubled from the night before and is at its peak. If it peaked too early, you'll see a line of residue on the glass that's higher than the current top of the starter. If that's the case, you might want to do another day of feedings (again, 12 hours apart), but this time use cooler water, higher ratios, or both.
Since you plan to use your starter today, the routine is a little different.
- You're not going to wait the full 12 hours to use the starter this time, so the ratios should be 1:2:2 and the water temperature should be warmer, up to 85°F/29°C, or a little cooler for warmer kitchens.
- You need to ensure that you have enough starter for your recipe as well as some to store away for the next bake. A good rule of thumb here is to divide the amount of starter in your recipe by 3.
Example: your recipe calls for 100g of starter. 1/3 of 100 is 33 so you'll use 33g of starter, 66g of water, and 66g of flour.
- Move 33g of the starter into a clean 16 oz jar, and add 66g warm water (about 80-85°F / 27-29°C). Discard the remaining starter.
- Stir the water and starter together, then add 66g of flour and thoroughly mix.
- Loosely cover the jar and mark the top line with a rubber band.
When I feed at 9am with warm water and 1:2:2 ratios, my starter is usually peaking in about 5 hours at around 2pm. Use a rubber band and/or marker to track the progress of your starter throughout the morning. Once you do this a few times you'll get a feel for the timing and it won't require as much babysitting.
Backing up your starter
Many a baker (including this one 🤓) has mixed the starter into the flour, washed out the jar, and then suddenly realized that they just threw away the last of their starter. The conventional wisdom here is to keep a "mother starter" in the fridge and when it's time to bake, start with a small amount of the mother starter and develop it in a separate jar. If something goes wrong, you always have the mother starter to go back to. I'm not a fan of the mother starter. For me, that means 2 jars to keep track of, feed, and clean. Instead I keep a "backup" of my starter in the freezer. Making a starter backup is easy:
- Smear about 50g of healthy liquid starter onto some parchment paper, spreading it out into a very thin layer
- Set out to dry for 1-2 days
- When the starter is completely dry, peel off the flakes and put them in a sandwich baggy
- Label and store the baggy in the freezer
If and when you need to rehydrate your backed up starter:
- Put about 5g of the dried starter in a jar with 20g warm water
- After a few hours, stir the jar contents until the flakes are mostly dissolved into the water
- Add 20g of whole wheat flour, stir, and let sit for another 12 hours
- Begin feeding the starter twice a day using your normal routine, first with lower (1:2:2) ratios, until the starter is doubling or tripling in size.
This is also a great way to give starter to a friend. It can even be sent through the mail!
Diagnosing problems
My starter smells weird.
Well, it's kind of supposed to! Depending on what stage of growth the starter is in, it may smell "floury", "yeasty", "funky", like vinegar, like overripe fruit, or like a teenage roller-rink party. These are all probably normal. I know, it goes against our sensibilities to put anything not "fresh" into the food we're making, but your starter is by definition a colony of bacteria and fungi so it's not going to smell that fresh. I find that a starter fed with whole grain flour smells much funkier than one fed with white flour. Neither is better or worse, just something to be aware of. Once you get to know your starter, you'll know what your starter should smell like.
There's some grayish/brownish liquid floating on my starter!
Congrats, you've just made hooch! The preferred beverage of early 20th century hobos and circus folk. Yes, it's alcohol. No, you shouldn't drink it. Just pour it out and begin feeding your starter with lower ratios until it's healthy again.
There's pieces of something floating on top of my starter!
I don't know what that is, but it doesn't belong there and might be mold. Throw it out and start fresh with your backed up starter.
My starter won't grow.
- If it's been in the fridge for a while, it will need time to become active again so don't panic. If the starter seems unusually anemic, try feeding it with 100% whole wheat flour a couple of times and see if it bounces back. Warmer water and lower ratios might also help.
- Be sure to keep the lid of the jar on loose so that the gasses can escape. Or do what I do and use some Bees Wrap to cover the jar instead of a screw-on lid.
- This isn't common, but your city's water might be very base (i.e. high pH) while yeast prefers an acidic environment (pH of 4.5 - 6.0). Try adding 1/4 tsp of apple cider vinegar per liter of water to the water you feed your starter with. (Yes, that's a tiny amount but does the job!) If that helps, make a gallon jug of it and set it aside for all of your sourdough baking.
Get Rise from the App Store
Requires iPhone or iPad running iOS 16 or later.